Wednesday, December 1, 2010

1995 W124 Mercedes E320 Wagon - Brake Lines

This car has a lot of hydraulic lines on it, including 4.75mm, 6mm, and 5/16"...I think.
I replaced a bunch of the 4.75mm lines recently, and I used the Cunifer brake line from Fed Hill.  This is a copper-nickel alloy brake line, about $55USD for 25ft from Fed Hill, and $80Cdn at Napa for the same amount.  The material is really nice - forms beautifully (though it work hardens quickly - you can torch-anneal quite easily, but not after there is brake fluid in it!), does not corrode - but what the hell!  the fittings don't come in stainless - so what is the point of having a line that doesn't corrode when the fittings will?  I searched far and wide on the internet for stainless DIN/ISO metric bubble flare tube nuts - None whatsoever.  I'm thinking maybe I should make some and market them.  All the ones I could find are Zinc-chromated steel.  In fact, no stainless tube nuts of any style at all.  There were brass unions, but no brass tube nuts......wonder why?

So, the goal of replacing brake lines with premium copper-nickel lines became an excercise in working to eliminate any fittings (use long continuous lines, without intermediate joints, and locate joints in protected areas), and where there are fittings, provide slack - so you can remove the rusted steel fitting by cutting off the end of the formed tube, then put a new one, and reform the tube end.

Anyway, This was a big job for me - working with the car jacked up on stands (no lift at home - yet).
Fed Hill makes a pretty cool looking flaring tool for about $300 - but it is a bench-top tool, which I think is an issue.  There is a UK company making the same style of tool for about 1/2 the price - I would go with them first.
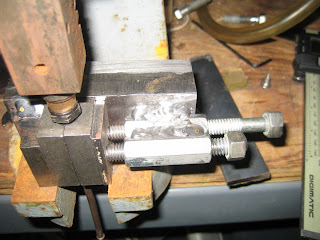
But since I didn't want to pay that much, I bought only the die from Fed Hill for about $40 and made a little vise to hold them while I formed the flare with my small arbor press.  See pics below.  The vise was made using a 220V Lincoln Mig welder from Canadian tire, couple of blocks of scrap steel, two 3/8" coupling nuts and two bolts of unequal length (otherwise there is no space to turn the nuts). 

The dies from Fed Hill are long, and have no serrations inside - they are smooth-walled, and therefore leave no tooling marks on the tube.  The added length probably improves the grip on the tubing. 
Was not sure if this little vise and arbor press would work at first, but it works beautifully.  Note how chunky my little vise is, and how it has two screw-clamps very close together.  This allows me to place a lot of pressure on the die to grip the tube well.  The position of the vise screws also allows adjustment of lateral pressure on the die.  Without this feature, one half the die will always be a little cock-eyed in the clamp.  There is space to add more vise screws, but two was enough - without a whole lot of pressure on the screws, they clamp the tube effectively.  You can see in the first pic I have a bushing by the hardened steel die - it's used to keep that black steel die straight during forming.


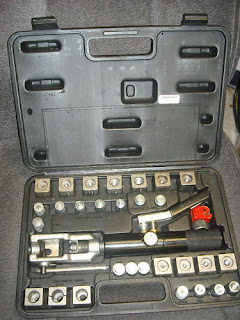
The below pic is of the Mastercool flaring set kit #71745.  This set can be had for about $320 USD on Ebay from retailers, or about $450 CDN from Value Tools in Toronto (located downstairs at Sheridan Mall - Jane and Wilson).  I went and took a good look at this tool, and I can say I've learned a few things. 
  1. It has the same weakness all the other tools do:  Gripping the tube well enough.  You can see the tool is really well designed otherwise (I love the compact hydraulic ram, which is small enough to use on-car), and the price shows it, but the clamp is still too dinky, with a single screw and a weak frame.  The dies are also not as long as the dies I got from Fed Hill, and the dies have mild serrations in them as well.  The Fed Hill die has none.  I therefore decided not to buy it.  Of course, struggling with my arbor press on-car was a hassle.
Below:
These are various flares:
On the right is a flare made with a cheap tool like the one in the previous post, leaving all kinds of teeth marks.  The middle two are flares that come on pre-formed tubing you can buy from auto parts stores.  The left-most is the copper-nickel tube flared by me with the arbor press and just a pair of vise grips holding the die blocks in the arbor press - it is slightly off-centre, but it was my first try, and with no stable die clamp.  Later, using my little home-made vise, the flares were much better - as good as the ones from the store, and better.  You can see the ones from the store vary a great deal.
I also tried with the green polymer-coated tubing, which is a significant step up in quality from the cheapest zinc-plated steel tubing.  I found this material hard to work with, because the tubing is so slippery.


Thursday, October 14, 2010

Brake Line Flaring Tools. Materials, Fittings and Detailed Discussion

Note the Tool Marks on the upper line, made by the low-end bubble-flare tool.  The lower tube was a prefab tube purchased at an auto-parts store.  Incidentally, I believe this lower tube is SAE buble-flared, and upper is an ISO bubble flare (or 'mushroom' flare).  Note the upper tube flare diameter is below the tolerance for minimum size.

This is the simple, inexpensive style of tool used to make that top-most flare above.  It results in unacceptable tool marks and burrs on the shoulder of the tube.

This is the bore of the flaring tool - the part that grips the tubing and leaves the teeth marks.  These bores appear to be formed with regular threading tools and there seems to be very little blunting of the sharp threads in the bores - thus the teeth marks.

I purchased the bubble flare tool from Ultrapro just recently at $160 (same style of tool available elsewhere for $50 - such as from Summit Racing).  It does 4 different sizes of ISO bubble flares - so I tried it out and don't like it - two reasons:
1. It marrs the brake line on the shoulder.  The grips on the flaring tool cause this marring, which is basically grip marks, biting into the tubing (right through the finish).  Marks resemble your leg or arm after being bitten by a dog or alligator -see pic.  This encourages corrosion in the area where the tube was gripped by the tool.  I feel the teeth marks are due to the very short length over which the line is held.  The grip length is 11.85mm for the 4.75mm line and 11.3mm for the other line sizes of 6, 8, and 10mm.  This short grip length probably necessitates the use of gripping teeth in the clamp interior surfaces.  The simply formed die shapes are only threaded holes sliced in half.  The threads don't seem to be blunted at all.  The whole thing is chrome plated.
There is another tool offered by Fedhill which you can find here:  http://store.fedhillusa.com/475mmdin.aspx
And their FAQ's for brake line service is pretty good:
http://store.fedhillusa.com/technicalhelphowtopdfs.aspx
Similar tool by BrakeQuip:
My favorite tool is the Mastercool style (expensive, but comparable to the ones above), which is very slim and can be operated anywhere, including deep in the body of the vehicle or machinery.  The Fed Hill and BrakeQuip tools are efficient, but are designed for use on a bench (heavy and bulky, and intended to be mounted).


These tools use dies which have a much longer, plain-bore gripping area, so marring of the line's finish will be much diminished or eliminated.  You can see in the pics I took the prefab lines seem to have no marring on the shoulder at all - I imagine this is a result of using dies like the ones from Fedhill.  Actually looking closely at he prefab line, one can see very slight flattening of high spots on the tubing, and very minute marring just behind the bubble - but it is really much, much better than the results from the Ultrapro tool.  It also seems the prefab tool has been lathe-finished or grinder-finished on the front face of the bubble (the mating face), which has a small step from the plain finish of the shaped steel to the clean/polished mating surface - so I expect that the prefab lines are using a forming and maching process, not just a forming process.  Note that the marring from the Ultrapro tool will not be seen by someone inspecting the finished brake line installation since the shoulder fitting will hide the teeth-marks.  I suppose this area can be protected from corrossion with some thick grease applied during assy - but avoid getting any grease inside the brake line!

2. The bubble for the standard (euro-auto) 4.75mm ISO bubble flare is not a great shape, size, and profile.  The bubble that comes on the pre-fabricated lines is 7.2mm diameter (measured with my digital caliper).  The bubble resulting from the Ultrapro tool is 6.44mm diameter.  The depth of the bubble is also reduced from the pre-fab standard, from 3.1mm to about 2.25mm.  Also, the transition from shoulder to bubble is sharp - the pre-fab line has a more gentle transition from shoulder to bubble.

Lines:
4 types, with prices in Cdn Dollars, as of Oct. 2010, Toronto, 4.75mm line:
Interesting web page discussing pros and cons of brake lines:
http://www.austinhealeywood.com/brakestory.html.  Note they too, have no stainless tube nuts, despite their strong promotion of the copper-nickel lines.  They do discuss the downside of brass tube nuts.  In short, avoid the stainless line - it is too hard and can damage the softer seats in the valves and unions.
1. Satin-Coated Steel (probably electroless zinc plating)  $15.95/25ft
2. Polymer-Coated Steel - $33.95/25ft coil
3. Copper (alloyed with nickel) - $80/25ft coil
Stainless - available on-line - I have to check the prices for this still, but at first it seems more expensive than the copper line.
The dimensions for these 3/16" lines appears to be 0.188"OD x 0.028" thick wall.
I have also found HVAC suppliers provide 3/16" copper line at much lower prices (1/2 or less) of the copper-nickel lines used in brake systems.  I tried to determine the material properties for these cheaper lines and they seem to use material resulting in working pressures of about 1100psi, whereas the copper-nickel lines have working pressures of about 1590psi.

Nuts:
Nuts appear to be M10 x 1.0mm for our european Mercedes and Audi vehicles.  Hopefully one installs stainless or brass nuts when using copper or stainless lines.  I've looked and despite the availability of stainless and copper brake lines, all the nuts I can find are steel!  So far I've found no stainless or corrosion-proof brake line nuts......nuts!

I purchased the 4.75mm ISO Bubble flare die from Fed Hill and their Cunifer Line. - Will report on the results. - I was annoyed that they charged $23.50 Shipping and $10 handling on top - For shipping to Toronto - Unfair!